How to Make a Minecraft Bedrock Server (Cross-Play for Console & Mobile)
On this page
- Bedrock or Java: which server do you actually need?
- Path A: Run the free Bedrock Dedicated Server yourself
- How players connect — and the console catch
- You're not invited to play on this server
- Path B: Rent a hosted Bedrock server (online in minutes)
- Add-ons and importing a world or Realm
- Keeping your server on the right Bedrock version
- FAQ
If your friends play Minecraft on an Xbox, a PlayStation, a Switch, a phone or the Windows app, you need a Bedrock server — the one edition built for cross-play, where every device meets in the same world. This is not the Java route, and most "how to make a Minecraft server" advice online quietly assumes Java, so the details here are different on purpose.
There are two honest ways to do it: run the free Bedrock Dedicated Server on your own PC, or rent a hosted server that is online in minutes. This guide covers both end to end, plus the one thing that trips up every console player — how to actually connect an Xbox, PlayStation or Switch to a server that is not on Minecraft's featured list.
Bedrock or Java: which server do you actually need?
Minecraft has two editions, and they cannot share a server — a Bedrock player cannot join a Java server, and a Java player cannot join a Bedrock one. So before anything else, work out which edition your group plays.
You need Bedrock if anyone in your group is on:
- Xbox (Series X|S or One)
- PlayStation (5 or 4)
- Nintendo Switch
- a phone or tablet (iOS or Android)
- the "Minecraft for Windows" app from the Microsoft Store
Those are all Bedrock. The whole point of Bedrock is cross-play: one server, one address, and a friend on a phone builds on the same plot as a friend on a PlayStation, with the same world and the same backups. If even one person in the group is on a console or a phone, Bedrock is what keeps everyone together.
You need Java only if your whole group plays the standalone Java Edition launcher on PC and you want plugins, Forge or Fabric mods, or a big CurseForge modpack. None of that exists on Bedrock. If that is your group, this is the wrong guide — head to How to Make a Minecraft Server for the Java walkthrough, or straight to Java Minecraft hosting.
Everything below is Bedrock-specific. The Java habits — the server.jar, port 25565, installing plugins — do not apply here, and following them is a common reason a console player ends up unable to connect.
Path A: Run the free Bedrock Dedicated Server yourself
Mojang publishes a free Bedrock Dedicated Server (often shortened to BDS) for Windows and Linux. It costs nothing and runs on a spare PC. Note there is no official macOS build — Mac users self-host inside a Linux virtual machine or container, or take the hosted route below.
- Download the Bedrock Dedicated Server. Get the official Windows or Linux build from the minecraft.net Bedrock server download page. It arrives as a ZIP — there is no installer and no Java to set up, because Bedrock is a native program, not a Java one.
- Unzip it into its own folder. Extract the ZIP into a new, empty folder. The server writes worlds, logs and config files right next to the program, so give it a clean home rather than dropping it in your Downloads folder.
- Edit
server.properties. Openserver.propertiesin any text editor. The lines worth setting on day one areserver-name(shown in the player's list),gamemode,difficulty,max-players, and the port. Leaveserver-port=19132as it is unless you have a reason to change it — 19132 is the Bedrock default, and it is UDP, not TCP. - Start the server. On Windows, double-click
bedrock_server.exe. On Linux, run it from a terminal opened in that folder:LD_LIBRARY_PATH=. ./bedrock_server
The console prints its version and finishes with a line reporting the IPv4 and IPv6 ports it is listening on. That is a working server. - Test it on your own network first. On a phone or the Windows app on the same Wi-Fi, add a server using the PC's local IP (for example
192.168.1.20) and port19132. If you can join, the server itself is fine and only the internet-facing part is left. - Forward UDP port 19132. For friends outside your home to connect, log into your router, find Port Forwarding, and forward UDP port 19132 to your PC's local IP. Give the PC a static local IP (or a DHCP reservation) first so the rule does not break the next time it reconnects.
Once the port is open, friends connect to your public IP (search "what is my IP" to find it) on port 19132. If your provider hands you a dynamic IP that changes over time, a free dynamic-DNS name keeps the address stable. That is a complete free server — but read the next section carefully, because on Bedrock, "how do people join" is a bigger question than it looks, especially for anyone on a console.
How players connect — and the console catch
On Bedrock, joining a server is not the same on every device, and consoles have a genuine catch that surprises people. Here is how each platform connects.
Windows 10/11 and mobile (iOS, Android) are the easy case. Open the game, go to Play, then the Servers tab, then Add Server at the bottom of the list. Enter the server address and port (19132 unless you changed it), save, and it stays in your list for next time. Done.
Xbox, PlayStation and Switch are the catch. Consoles do not let you type a custom server address anywhere in the game — the Servers tab only shows Minecraft's featured partner servers, and there is no "Add Server" box. That is a platform restriction, not something the server owner can switch on.
The trick works because the console asks the connector where the featured servers are, and the connector answers with its own menu instead. It changes nothing else about the console or your network, and you can undo it any time by setting DNS back to Automatic. The steps are the same idea on each device, and you only do them once:
- Xbox: Settings, then General, then Network settings, then Advanced settings, then DNS settings. Switch it to Manual and enter the connector's DNS address, then restart Minecraft and open the Servers tab.
- PlayStation: Settings, then Network, then Set Up Internet Connection. Choose Custom, leave most options on Automatic, and set DNS to Manual using the connector's address.
- Nintendo Switch: System Settings, then Internet, then your connection, then Change Settings. Set DNS to Manual and enter the connector's address.
Because these free connector DNS addresses occasionally move, look up the current one from the connector project itself rather than trusting an old number in a video. On a hosted server this is the one thing we hand you directly — a working address and the current per-console steps after setup — so you are not chasing a stale value.
You're not invited to play on this server
Locked out of your own server by that message? Here is the fix, before any explanation. It takes about a minute.
- Open the server console — the Console tab in your hosting panel, or the terminal window the server is running in if you self-host.
- Add every player by their exact Xbox Gamertag, one line each, then reload and check the result:
allowlist add YourGamertag
allowlist add "Gamer Tag With Spaces"
allowlist reload
allowlist list
The last line prints the list back to you, so you can confirm the names landed before anyone tries again. - Or switch the list off instead: open
server.properties, changeallow-list=truetoallow-list=false, save, and restart the server. Everyone with the address can then join — read the restart trap below before you choose this one.
The exact wording varies by build and device. Current versions say "You're not invited to play on this server."; you will also see it written as "You are not invited to play on this server", or shortened to "You are not invited to this server" when someone retypes it from memory. Older builds and third-party server software phrase the same rejection as not on allowlist or not whitelisted. All of them are the same problem.
What the message actually means
Your server has an allowlist — a list of the only Gamertags allowed to connect — and it is switched on while the list is empty. Concretely, that is allow-list=true in server.properties paired with an allowlist.json that still reads []. With nobody on the list, the server refuses every connection, and the owner is not an exception: paying for the server is not a permission on Bedrock.
Note what it is not. It is not the wrong port, not a version mismatch, not an unpaid invoice, not a suspension and not a crash. The server is running and answering you — it is answering "no". That is exactly why it is confusing: the server shows as online, and you still cannot get in.
It is also the state a fresh Bedrock Dedicated Server starts in. The current build ships allow-list=true with an empty allowlist.json, and it says so in the boot log before anyone has even tried to connect:
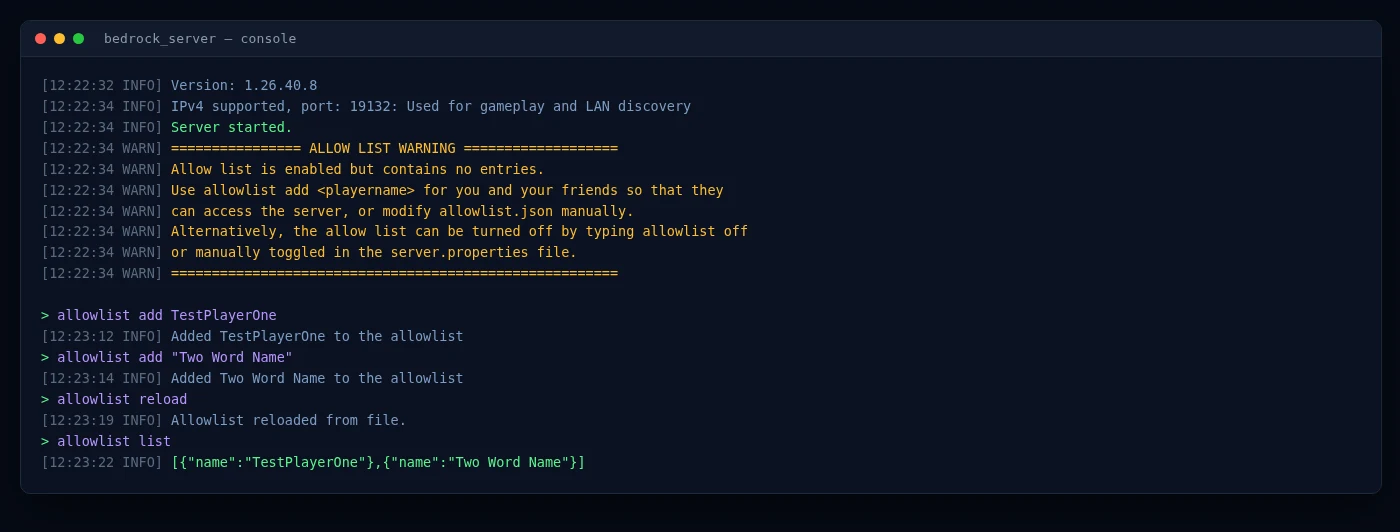
Fix A — keep the allowlist and add your players
This is the option to take if the server is for a known group. In the console, add one Gamertag per line, then reload the file and read the list back:
allowlist add ExampleName
allowlist add "Example Name"
allowlist reload
allowlist list
Two details decide whether it works first time: use the Xbox Gamertag exactly as it appears on the player's profile, spaces and capitals included, and wrap any Gamertag containing a space in double quotes, as in the second line above. Run allowlist reload whenever you edit allowlist.json by hand, so the running server picks up the file instead of the copy it read at startup.
allowlist add, not /allowlist add — a leading slash answers Unknown command: /. and nothing happens. Java people trip on this constantly, because there the same job is /whitelist add in an in-game chat window.Fix B — turn the allowlist off
If the server is meant to be open, or you just want everyone in tonight and will tidy up later, switch the list off at the source: open server.properties in the panel's file manager (or your text editor), change allow-list=true to allow-list=false, save, and restart the server. From then on anyone who has the IP and port can join.
Be clear about the trade-off first: with the allowlist off, the address is the access, and anyone you send it to can pass it on.
The restart trap that makes the fix look broken
allowlist off replies "Turned off the allowlist" and works immediately — but it never writes to server.properties. The file still says allow-list=true, and because the server reads it fresh at every boot, the list comes back on the next restart, update or crash-recovery. Everyone is locked out again a week later, and it looks like the fix simply did not hold.So: allowlist off is fine for right now, and allow-list=false in server.properties is the one that lasts. Do both if you want the server open immediately and open tomorrow.
Which one should you pick?
If the server is for your kids and their friends, keep the allowlist and add the names — it costs you one console line per player and it means a stranger who gets hold of the address cannot walk into the world and take it apart. If it is a public or community server, turn it off, because maintaining a list of everyone who might ever join is not a workable job. There is no wrong answer, only the one that matches who you want in there.
permissions.json — not in an ops.json, which is the Java file.Allowlist or whitelist — the same feature, two names
Both words describe one thing. Mojang renamed the Bedrock feature from whitelist to allowlist in version 1.18.10: whitelist.json became allowlist.json and whitelist became allowlist. The old names still work for backwards compatibility and are deprecated — and if a whitelist.json is present, the server uses it instead of allowlist.json, which is worth knowing if you moved from an older host and your edits to the new file appear to do nothing. Guides, videos and hosting panels use both words freely, so treat "how do I whitelist someone on Bedrock" and "how do I allowlist someone" as the same question.
Both fixes are a console line and a file edit — which is a two-minute job when the panel hands you a live console, a file manager and a restart button. HytHost Bedrock hosting starts at €2.59 a month.
See Bedrock hosting plansPath B: Rent a hosted Bedrock server (online in minutes)
A hosted Bedrock server is the same Bedrock Dedicated Server software running in a datacenter instead of on your PC — online around the clock, on hardware built for it, behind real DDoS protection. Everything fiddly from Path A (the ZIP, server.properties, forwarding the UDP port, keeping a PC awake) is already handled. The setup looks like this:
- Pick a size. On the Bedrock server hosting page, choose the Bedrock path and set the RAM with the slider. Bedrock is lighter than heavily-modded Java, so player count and add-ons drive the size more than anything else — the RAM guide covers how to think about it.
- Check out. The server is provisioned automatically and is live within moments of the order — no ticket, no waiting on a human. Your panel login and the server address arrive by email.
- Share the address. You get the IP and port to hand out immediately, and we can set up a free subdomain like
play.yourname.comso it is easy to remember and type — handy when a friend is squinting at it on a phone. - Add your people. Windows and mobile players add the address straight away; console players use the DNS-connector method from the section above, and we give you the current address and per-console steps so nobody is guessing.
- Manage it from the panel. The GameCP panel gives you a live console, a file manager, SFTP access and one-click backups. Snapshot the world before you try a new add-on, and restore it in a few clicks if things go sideways.
What you are paying for, concretely: the server stays online with a 99.9% Uptime SLA whether your own PC is on or not, Voxility DDoS protection absorbs attacks that would flatten a home connection, and worlds sit on NVMe SSD storage with high-clock CPUs. If you get stuck, live chat support is available 8 AM – 11 PM (Chișinău time). It is the same cross-play server from Path A, without the parts that go wrong — you can weigh it against self-hosting any time on the Bedrock hosting page.
Skip the setup — a HytHost Bedrock server is online in minutes, with cross-play, DDoS protection and backups included.
See Bedrock plansAdd-ons and importing a world or Realm
Bedrock does not have Java-style mods or plugins. It customises through add-ons, which come in two kinds: behavior packs change how the game works (new mobs, mechanics, loot) and resource packs change how it looks (textures, models, sounds). You upload them to the server and enable them on the world, and every connected player — console, phone or PC — gets them automatically. This is a real difference from Java: if you were expecting Forge or a permissions plugin, that belongs on the Java server software side, not on Bedrock.
Bringing over a world you already have is straightforward, because a Bedrock world is just a folder:
- From a single-player save or another server: upload the world folder through the panel's file manager or over SFTP, point the server at it, and it loads with builds, inventories and progress intact.
- From a Realm: download the world from inside the game first (a Realm's settings let you export the current world as a backup), then upload that folder the same way. Once it is on your server there are no per-player Realm seats — anyone with the address can join.
Self-hosting from Path A? The same folder swap works there: drop the world into the server's worlds directory and set level-name in server.properties to match. On a hosted plan, one-click backups mean you can snapshot before importing and roll back if something looks off. Migration help is free — if you are moving from a Realm or another host, support can take care of it.
Keeping your server on the right Bedrock version
Bedrock has one quirk Java players do not deal with the same way: consoles and phones update Minecraft automatically, and a client refuses to connect to a server running an older version. So the day a Bedrock update rolls out, an out-of-date server locks everyone out until it is brought up to match.
Self-hosting, that means re-downloading the Bedrock Dedicated Server ZIP each time an update lands and swapping in the new build while keeping your world folder. It is not hard, but it is on you, and it tends to happen at the worst moment — right when your players have all updated and want to log in.
On a hosted plan the server is brought up to match new Bedrock releases, so there is no long window where console players are stuck on the loading screen. If you need to hold on a specific version for an add-on or an event, you can manage that from the panel instead. Either way, "the update dropped and now nobody can join" stops being your problem.
That version lock-step is also why Bedrock and Java servers can never merge, and why picking the right edition up front matters more than any single setting — the Java setup guide covers that side if part of your group is on PC.
Frequently asked questions
If anyone in your group plays on Xbox, PlayStation, Switch, a phone, or the Microsoft Store "Minecraft for Windows" app, you need Bedrock — it is the only edition with cross-play across all of those. Java Edition is the standalone PC launcher, and it is where plugins, Forge and Fabric mods live. The two cannot share a server. If you are a PC-only group after mods, start with our Java setup guide instead.
Consoles do not let you type a custom server address in the game — the Servers tab only lists Minecraft's featured partner servers. To join your own server you point the console's DNS at a free connector service such as BedrockConnect, which adds a "connect to a server" option so you can enter any address. It is a one-time setup per console. On a hosted Bedrock server we give you the current connector address and the exact per-console steps.
The default Bedrock port is 19132, and it is UDP, not TCP. This trips up people coming from Java, where the port is 25565 and TCP. If you self-host and forward the TCP port by mistake, the server stays unreachable — forward UDP 19132.
Bedrock is lighter than heavily-modded Java, so player count and add-ons matter more than raw memory. A small server for a few friends runs on modest RAM, while bigger communities or add-on-heavy worlds want more headroom. The general approach is in our RAM guide, and on a hosted plan you can upgrade in place if the world fills up.
Yes. A Bedrock world is a folder of files. Upload it through the file manager or over SFTP and the server loads it with builds and progress intact. For a Realm, export the world from inside the game first, then upload that folder. On HytHost, migration help is free.
Yes. Bedrock customises with add-ons — behavior packs that change how the game works and resource packs that change how it looks. Upload them through the panel and enable them on your world, and every connected player gets them automatically. Bedrock does not use Java-style mods or plugins.
The server has its allowlist enabled — allow-list=true in server.properties — while allowlist.json is still empty, so no Gamertag is authorised and every connection is refused, including the owner's. There are two ways out. Add each player from the server console with allowlist add Gamertag (use double quotes around a Gamertag containing spaces) followed by allowlist reload. Or set allow-list=false in server.properties and restart, which switches the list off for everyone. Note that allowlist off typed in the console only lasts until the next restart, because server.properties is read again at boot. The step-by-step version is in the section on this message above.
Ready to bring everyone into one world?
Launch a Bedrock server that is online in minutes — one address for Xbox, PlayStation, Switch, mobile and PC, with DDoS protection and one-click backups included. Free migration if you bring a Realm or an existing world.
Live chat 8 AM – 11 PM (Chișinău time) · tickets answered during business hoursWas this guide helpful?