How to Make a Minecraft Server
On this page
There are two honest ways to make a Minecraft server in 2026: run one yourself on your own PC for free, or rent a managed server that is online in minutes. This guide walks you through both, start to finish, so you can pick the route that fits your group.
The self-hosted path is a real tutorial, not a teaser — by the end of it you will have a working Java server your friends can join. The hosted path shows what you skip when the setup, updates and uptime are someone else's job. Either way, you will know exactly how much RAM you need and which server software to pick.
What you need before you start
First, know which edition your group plays. This guide covers Minecraft: Java Edition — the PC version where dedicated servers, plugins and mods live. If your friends play on consoles, phones or the Windows app from the Microsoft Store, that is Bedrock Edition, and the server works differently: see our Minecraft Bedrock hosting page instead. Java and Bedrock players cannot join the same vanilla server.
For the self-hosted route you will need:
- A PC with spare RAM. The server runs alongside your game, so if you play on the same machine, plan for at least 8 GB total — roughly 2-3 GB go to the server, the rest to Minecraft itself and your OS.
- Java 25. Current Minecraft servers require Java 25. Older game versions need older Java releases (1.20.5 through 1.21 run on Java 21) — a Java/version mismatch is one of the classic reasons a server refuses to start.
- Access to your router. Friends outside your home network can only join after you forward a port, which means logging into the router's admin page.
- 30-60 minutes the first time through.
For the hosted route you need none of the above — just a browser. We will get to that in Path B.
Path A: Make a free Minecraft server on your own PC
This is the classic way, and it costs nothing. Here is the full sequence for Windows; macOS and Linux follow the same steps with their own installers and terminal.
- Install Java 25. Download the free Temurin 25 build from adoptium.net and run the installer. To confirm it worked, open a terminal (Windows: search for "cmd") and type
java -version— you should see version 25. - Download the server file. Get the official
server.jarfrom the minecraft.net server download page. Put it in a new, empty folder — the server will create a dozen files around itself, and you do not want that happening on your desktop. - Run it once to generate the files. In a terminal opened inside that folder, run:
java -Xmx2G -Xms2G -jar server.jar nogui
The-Xmx2Gpart is how much RAM you are giving the server (2 GB here — adjust it later using the RAM guide below). The first run stops immediately on purpose: it writes the config files and asks you to accept the license. - Accept the EULA. Open the new
eula.txtin any text editor, changeeula=falsetoeula=true, save, and run the same command again. This time the world generates and the console reportsDone.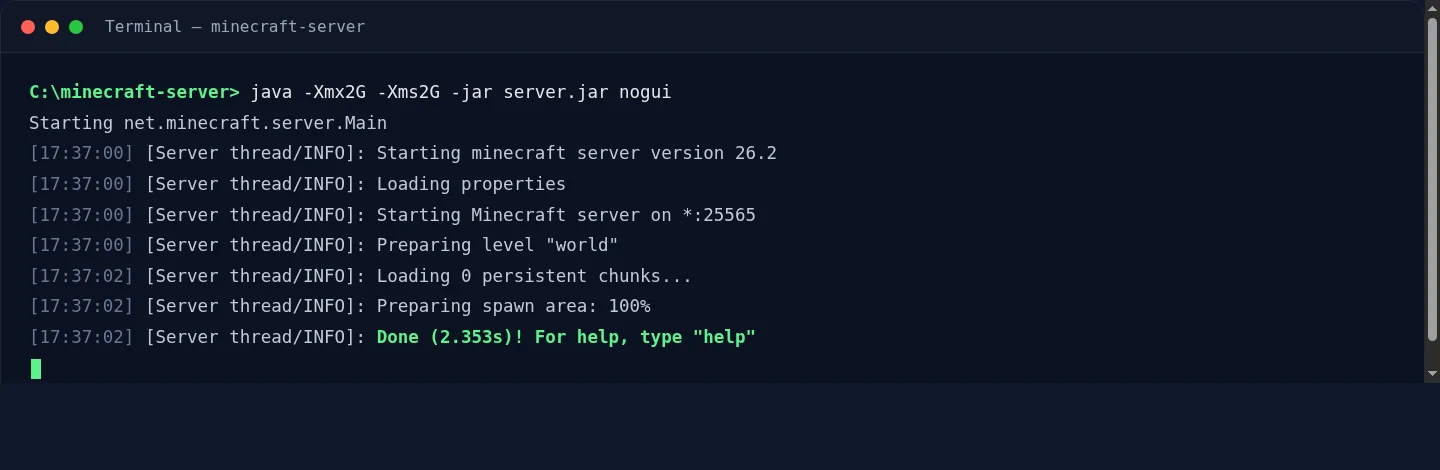
A successful start: the server prints its version, prepares the world, and reports Done— it is now listening on port 25565. - Join your own server. Start Minecraft (same version as the server), go to Multiplayer, then Add Server, and enter
localhostas the address. If you spawn in, the server works — now let's get your friends in.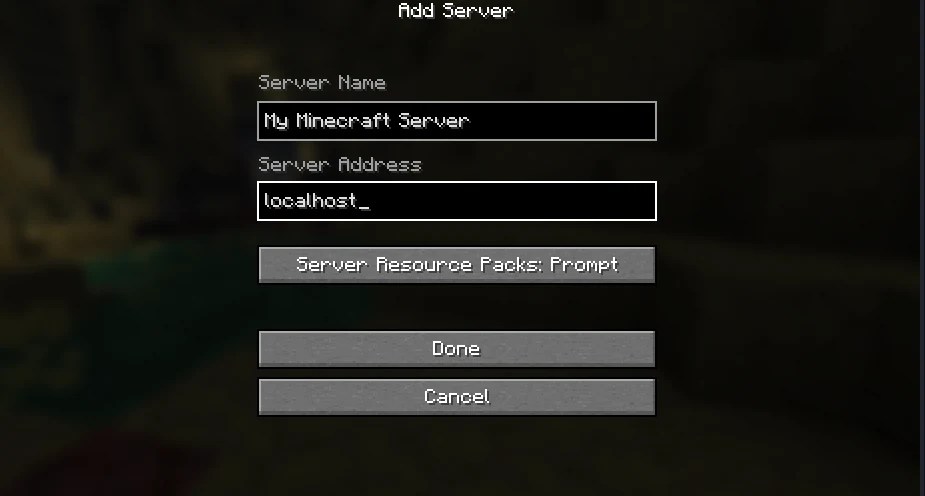
Adding your own server in Minecraft: any name you like, and localhostas the address to connect to the server running on the same PC. - Set your server's basics. Stop the server (type
stopin the console) and openserver.properties. The lines worth touching on day one:motd(the name shown in the server list),max-players,difficulty, andview-distance(lower it to 8 if the server feels heavy). Give yourself admin rights in the console withop YourUsername. - Forward port 25565. This is the step where most people get stuck, because every router's menu is different. Log into your router (the address is usually printed on its label), find "Port Forwarding", and forward TCP port 25565 to your PC's local IP address. Setting a static local IP for your PC first (or a DHCP reservation) stops the rule from breaking every time the PC reconnects.
Heads up: forwarding a port publishes your home IP address. Anyone you give the address to — and anyone they pass it to — can see it, and a griefer with a stress-testing tool can knock your whole home connection offline. Only share the address with people you trust.
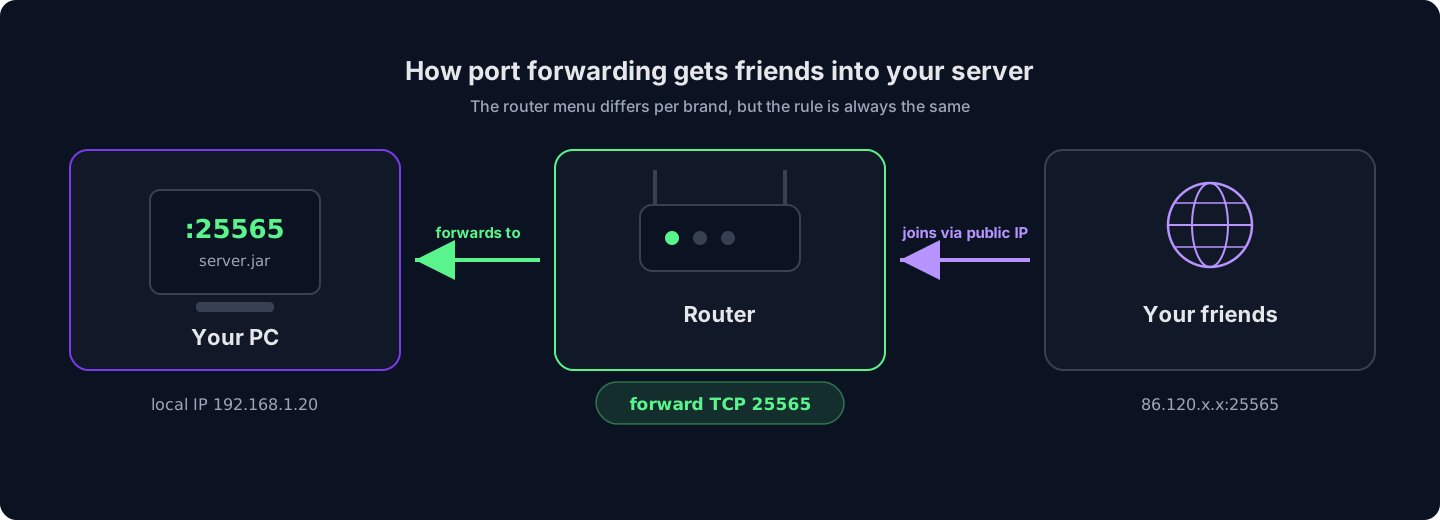
The router menu differs by brand, but the rule is always the same: forward TCP 25565 to your PC, and friends join on your public IP. - Share your public address. Your friends connect to your public IP (search "what is my IP" to see it), not to
localhost. If your provider gives you a dynamic IP, that address will change every so often — a free dynamic-DNS name works around it.
That is a complete, working server. Before you commit to it as a permanent setup, weigh what you are signing up for:
What's great about self-hosting
- Completely free — no subscription, ever
- Full control over every file and setting
- You learn how servers actually work
- Perfect for LAN parties and same-house play
What you are taking on
- The server is only online while your PC is on
- Home upload speed caps how many players it handles smoothly
- Your home IP is exposed, with no DDoS protection in front of it
- Backups, updates and crash recovery are all manual, all yours
Skip the setup — a HytHost Minecraft server is online in minutes, with DDoS protection and backups included.
See Minecraft plansPath B: Rent a hosted Minecraft server (online in minutes)
A hosted server is the same Java server software running in a datacenter instead of your bedroom — online around the clock, on hardware built for it, behind real DDoS protection. Everything from Path A (Java versions, eula.txt, port forwarding, keeping the machine awake) is already handled. Here is the whole setup:
- Pick a size. On the Minecraft hosting page, choose how you play — vanilla with friends, a modpack, or a fully custom setup — and pick the RAM using the slider. The plan copy tells you what each size comfortably runs, and the RAM guide below applies here too.
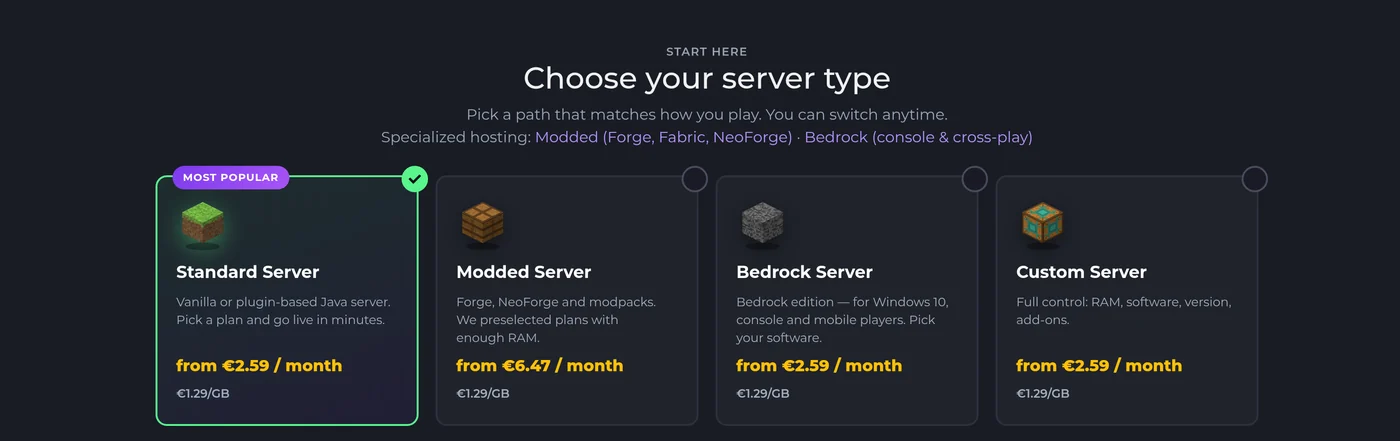
Start by picking a server type on the Minecraft hosting page, then set the RAM — Standard covers vanilla and plugin servers, Modded is pre-sized for modpacks. - Check out. The server is provisioned automatically — it is installed and online within moments of the order, no ticket or waiting for a human. Your panel access arrives by email.
- Pick your version and software. In the GameCP panel, the version changer switches between Vanilla, Paper, Purpur, Forge, Fabric or NeoForge and any Minecraft version in a couple of clicks — the matching Java version is selected for you automatically, so the "wrong Java" failure from Path A simply does not exist here.
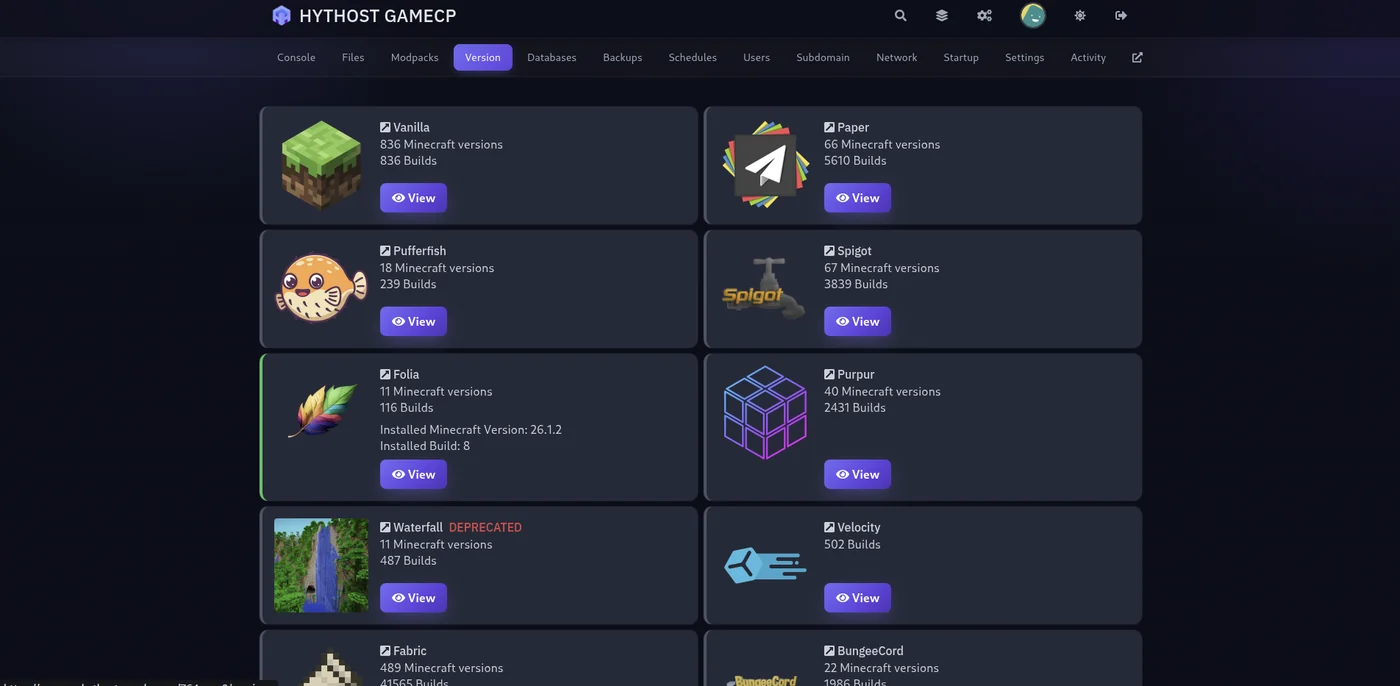
The version changer in the panel: pick any server software and Minecraft version, and the build installs itself — no jar downloads, no Java guesswork. - Want a modpack? The built-in installer searches CurseForge, Feed The Beast, Modrinth and Technic, and sets up the pack — loader, Minecraft version, Java — in one click.
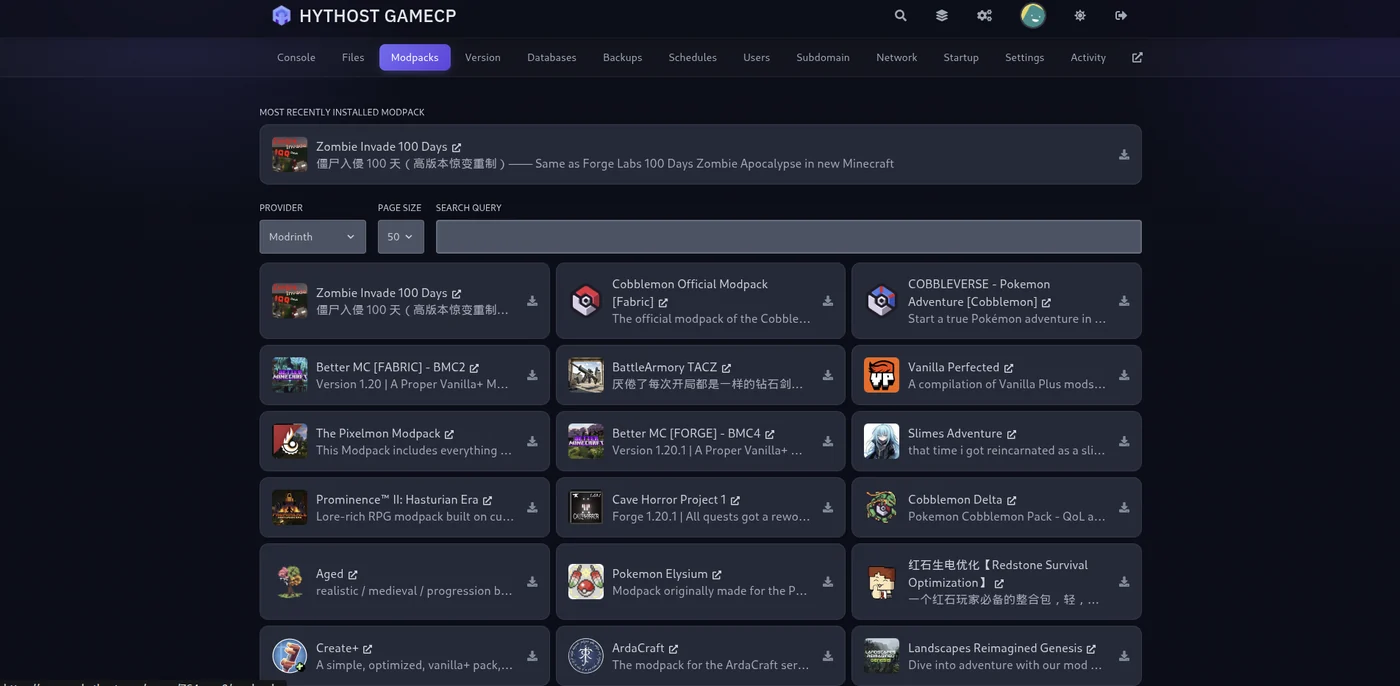
The modpack installer: search a provider, pick a pack, and it installs the loader, Minecraft version and Java for you. - Invite your friends. Share the server address (we can set up a free subdomain like
play.yourname.comso it is easy to remember). Friends who help you run the place can get their own free panel sub-user login — no password sharing. - Set up backups. One-click backups live in the panel; snapshot the world before you experiment with a new plugin or pack, restore in seconds if it goes sideways.
What you are paying for, concretely: the server stays online with a target of 99.9% uptime whether your PC is on or not, Voxility DDoS protection absorbs attacks that would flatten a home connection, worlds sit on NVMe SSD storage with high-clock CPUs, and if you get stuck, live chat support is available 8 AM – 11 PM (Chișinău time). Already running a self-hosted world? Migration is free — see the FAQ.
How much RAM does a Minecraft server need?
RAM is the number one sizing question, and the honest answer depends on two things: how many players you expect, and whether you run mods. Vanilla is light; every plugin adds a little; modpacks are the real RAM eaters, because each mod loads its own code, items and world-generation into memory.
| Setup | Players | RAM to aim for |
|---|---|---|
| Vanilla with friends | 2-6 | 2-3 GB |
| Small SMP with plugins (Paper) | 5-15 | 4-6 GB |
| Light modpacks or bigger plugin packs | 5-15 | 5-8 GB |
| Most CurseForge modpacks | 5-15 | 9-12 GB |
| Heavy packs (ATM, RLCraft) or big communities | 15+ | 16 GB+ |
-Xmx value) — RAM you never use is money or headroom wasted.One more thing RAM cannot fix: Minecraft runs its world mostly on a single CPU thread, so single-core speed matters as much as memory. That is why throwing 32 GB at a lagging server often does nothing, and why hosted plans here run on high-clock Ryzen and Intel i9 CPUs rather than many slow cores.
Vanilla, Paper, Forge or Fabric: which server type should you run?
The server.jar from Path A is the vanilla server, but it is rarely what communities actually run. Four names cover almost every server in the wild:
- Vanilla — the official, untouched experience. Zero setup surprises, but no plugins and weaker performance at scale. Right for a handful of friends who want pure survival.
- Paper — the de-facto standard for public servers. Same gameplay as vanilla but dramatically better performance, plus support for plugins (ranks, protection, minigames) that install server-side only — players do not download anything. If you outgrow vanilla, this is the next step.
- Forge / NeoForge — the loaders for classic mods and the big kitchen-sink modpacks (All the Mods, RLCraft, FTB). Players must run the same mods on their side, which is why packs are the practical way to distribute them. NeoForge is the community fork that most new Forge-style development targets on recent versions.
- Fabric — a lightweight, fast-updating mod loader, home of performance mods like Sodium and Lithium. Best for smaller or performance-focused modded setups.
You do not have to get this right on day one. Switching software on a hosted plan is a couple of clicks in the version changer (your world survives the switch), and self-hosters just swap the jar. For a deeper dive into loaders and modpack sizing, see the modded Minecraft hosting page.
Keep your server safe and online
A few settings separate a server that lasts years from one that dies to the first griefer:
- Use the whitelist. For any private server, turn it on so only invited players can join — set
white-list=trueinserver.properties, then add friends from the console:whitelist add TheirUsername
- Keep
online-mode=true. It verifies every player against their real Mojang account. Turning it off ("cracked" mode) lets anyone impersonate anyone — including your admins. - Back up before you experiment. The world folder is the only thing you cannot re-download. Self-hosted: copy the
worldfolder somewhere else on a schedule. Hosted: use the one-click backups in the panel before every plugin or pack change. - Take DDoS seriously if you go public. The moment a server address circulates publicly, attacks stop being hypothetical. A home connection has nothing in front of it — one angry player with a booter takes your whole household offline. Datacenter hosting puts dedicated filtering (Voxility, in our case) between the internet and your server.
Frequently asked questions
Yes — the official Java server software is free, and Path A in this guide costs nothing beyond the PC you already own and the electricity to keep it on. You pay instead with your time: setup, port forwarding, updates, backups and keeping the machine online are all on you. Hosted servers charge a monthly fee to make all of that someone else's job.
2-3 GB comfortably runs a vanilla server for a group of friends. Plan 4-6 GB for a plugin server on Paper, 9 GB or more for most CurseForge modpacks, and 16 GB+ for heavy packs like All the Mods or RLCraft. The full breakdown is in the RAM section of this guide.
No. A self-hosted server runs only while the machine hosting it is powered on and connected — if you shut the PC down or it goes to sleep, everyone is disconnected. That is the single biggest reason groups move to a hosted server, which stays online around the clock in a datacenter regardless of what your own computer is doing.
They add your server address in Multiplayer, then Add Server. Self-hosted: the address is your public IP, and it only works after you forward TCP port 25565 on your router. Hosted: you just share the address from your panel (or a free subdomain like play.yourname.com) — no router setup for anyone.
Yes. Your world is a folder of files, and it transfers cleanly: upload it through the panel's file manager or over SFTP and the server loads it — builds, inventories and progress intact. On HytHost, migration help is free; if you have an existing server, support will move it for you.
Java Edition — the PC version where dedicated servers, plugins, Forge and Fabric live. If your group plays on consoles, phones or the Microsoft Store app, you need a Bedrock server instead; see the Minecraft Bedrock hosting page for how cross-play works there.
Ready to play instead of troubleshooting?
Launch a Minecraft server that is online in minutes — pick your RAM, pick your version, and the setup from this guide is already done. Free migration if you bring an existing world.
Live chat 8 AM – 11 PM (Chișinău time) · tickets answered during business hours